
automated feeding of your sandbox
Now that all peaces are available, it's about time to automate everything together to have it run and:
- find and download new malware
- analyse it automatically
- if worth, send it to MISP
- and share it with the community
Let's have a look how this can be established.
The shopping list
As I realised that my small Intel i3 with 16GB ram FreeNAS server will not do the job, it was the time to get hardware for this (and other) projects.
Ebay is doing a good job here. Try and get a HP DL380 (with as much RAM as possible) and some storage.
I was lucky enough to get both for less then 200€...!!!!
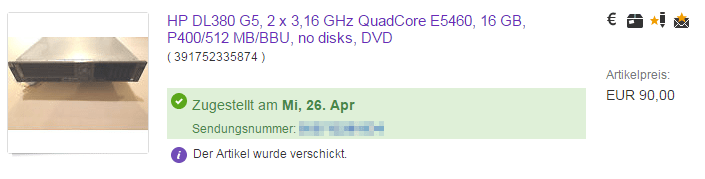
Using a Gen5 enabled me to use alle my DDR2-RAM pieces and was very cheap.
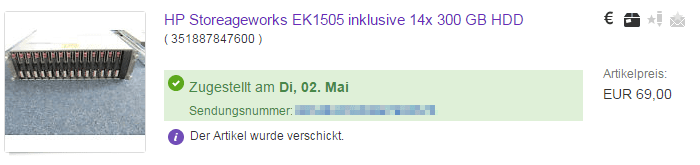
Storage. THere is never enough disk space. The VM's will live here.
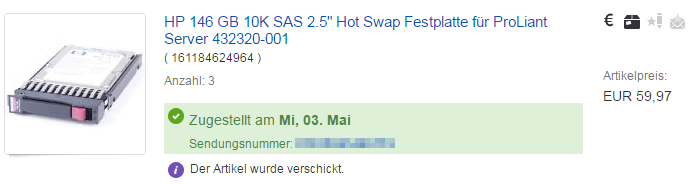
Some 2,5 SAS disks to host the VMware itself.

A FC controler for the DL380

And a GBic
The FC cable was still in my spare-kit box.
That's it with the hardware. Now for the operating system you need:
- VMWare ESXi 6.5 (unfortunatly the free version will not do, I used the STD) Check ebay, they are available for around 150€.
- Ubuntu 16.04 LTS
- Some Firewall (as being a former member of staff of Sophos, I highly recomend the Sophos UTM) [50 IP-Version free for Home use]
- Cuckoo modified
- ph0neutria
- MISP
Once you have all this, it's time for a rainy weekend to get started.
The infrastructure
Building the infrastructure with above new toys is a fun-action.
The main goal is to have enogh power to process all your stuff, but also to isolate the malware as much as possible from your remaining data.
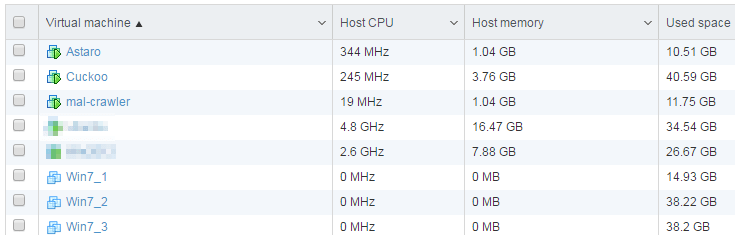
First, install the vSphere at your new DL380 (or equivalent hardware) and build at least two machines with Ubuntu on two seperated virtual switches.
- Ubuntu No. 1: The host for ph0neutria and viper; 8GB, 2 CPU, vSwitch0, VLAN 101
- Ubuntu No. 2: The host for Cuckoo; 8GB, 2 CPU, vSwitch1, VLAN 100
- i.e. Sophos UTM (or another firewall): 4 GB, 1 CPU, vSwitch1, VLAN 100, vSwitch0, VLAN 101, and your Internet access LAN
- At least one Windows "victim" machine to test the malware. I my case I used 3 for the beginning
This victim must be attached to a promiscous-enabled vSwitch (Vlan 102) for analysis purpose
And virtually connect the interfaces of the machines as below matrix shows.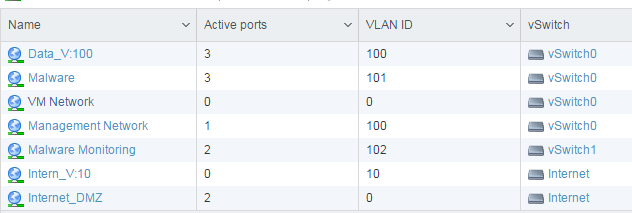
1. Firewall
To liit the chance of your collected malware to taint your life data, the setup of a firewall to limit traffic is highly recomendet.
As written above, I've used a Sophos-UTM to achieve this job. Butt feel free to use any other software based firewall.
Things you need to establish (see Sophos samples below):
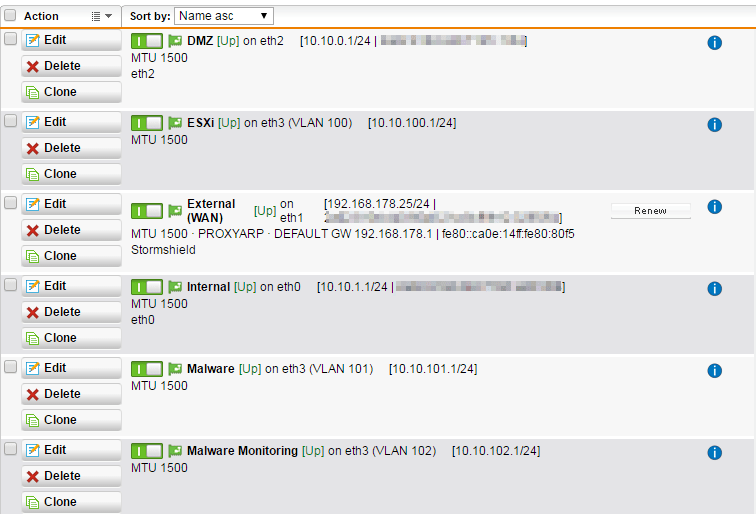
Physical definition of the participating NIC's
The "Malware" (V:101) shall as well be able to connect to the Internet only. - This machine does the actual download of the malware.
For managing purpose a ssh connection from your LAN might be granted.
Remember to exclude the host from snort etc.


I'm sure I've forgotten some ACL's to mention. I'll update as soon as I find out. In the mean time, check your FW-Logs for connection attempts that are needed and add a rule accordingly.
2. Cuckoo
Setup a Cuckoo instance within the Malware (V: ) network.
For the basic setup use either this or that howto.
As this whole article assumes a "equivalent" installation of VM's, the Cuckoo needs to tell the VM hypervisor to shut-down and start the victim machines.
Cuckoo supports this with the "vsphere" machinery. (Do not use the esx, it has issues with the memory dump in VMWare)
To make Cuckoo able to controle the victim machines, some extra work is necessary.
Kev's page on techanarchy.net help me a lot enabling this feature.
Let me just list the command I issed from more or less my bash history.
sudo apt install uuid-dev
sudo apt-get install gcc make pkg-config libxml2-dev libgnutls-dev libdevmapper-dev libcurl4-gnutls-dev python-dev libpciaccess-dev libxen-dev libnl-dev uuid-dev xsltproc -y
sudo apt-get install python-sqlalchemy python-bson python-dpkt python-jinja2 python-magic python-pymongo python-gridfs python-libvirt python-bottle python-pefile python-chardet python-django libgeoip-dev libjpeg-dev
sudo apt-get install libpciaccess-dev pkg-config libxml2-dev libgnutls-dev libdevmapper-dev libcurl4-gnutls-dev libyajl-dev
wget http://libvirt.org/sources/libvirt-1.3.4.tar.gz
tar -xvzf libvirt-1.3.4.tar.gz
cd libvirt-1.3.4/v
sudo apt install libnl-3-dev
sudo apt-get install libnl-route-3-dev
/configure --with-esx=yes./configure --with-esx=yes
make
make install
Despite the "usual" configuration of Cuckoo (see above howto's) the vsphere.conf needs to look like this:
[vsphere]
host = 10.10.100.2
port = 443
user = xxxx
pwd = xxxx
unverified_ssl = on
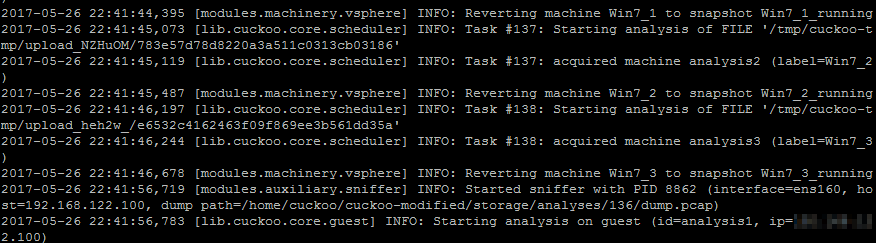
machines = analysis1,analysis2,analysis3
[analysis1]
label = Win7_1
platform = windows
ip = 192.168.122.105
snapshot = Win7_1_running
interface = ens192
resultserver_ip = 192.168.122.1
mem_profile = Win7SP1x64
[analysis2]
label = Win7_2
platform = windows
ip = 192.168.122.106
snapshot = Win7_2_running
interface = ens192
resultserver_ip = 192.168.122.1
mem_profile = Win7SP1x64
[analysis3]
label = Win7_3
platform = windows
ip = 192.168.122.107
snapshot = Win7_3_running
interface = ens192
resultserver_ip = 192.168.122.1
mem_profile = Win7SP1x64
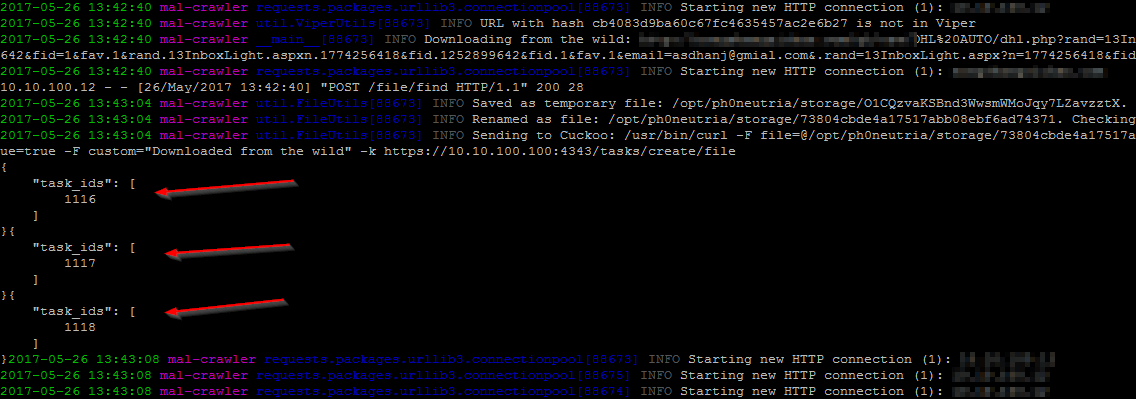
3. Find and download new malware
Chris aka phage-nz has done a great job in automated collecting malware, thus I used his scripts on a seperated virtual machine.
After sucessfully installing the programm, you end up with a Viper malware cage, filled with finest malware.
But the Viper is just a storage for the malware that should already have been send to your cuckoo analyser.
Now, this functionality (automated sending to cuckoo) ist not (yet) implemeneted in ph0neutria but the collect-and-store funktion was so great that I decided to try and alter the code. - Dispite the fact that I'm not aware of python at all.
But with a lot of reading, try-and-error and the help of some friends, I managed to get it running with the below additions to the code:
/opt/ph0neutria/util/FileUtils.py (and FileUtils.pyc)
Find the italcs part of my text within the file and add the "My additions" part to it.
And, jeah I know it very bad style in python and in a later version I could also do the definitions in main config file, and I should not use os.system, and, and, and... But I'm still beginning with python, and rather had a dirty working solution then a brilliant code that does not work. :-)
def getWildFile(url, urlMD5):
try:
userAgent = {'User-agent': baseConfig.userAgent}
if baseConfig.useTor == 'yes':
torProxy = 'socks5://localhost:{0}'.format(baseConfig.torPort)
proxies = {'http': torProxy, 'https': torProxy}
request = requests.get(url, headers=userAgent, proxies=proxies)
else:
request = requests.get(url, headers=userAgent)
if request.status_code == 200:
response = request.content
tmpName = randomString(32)
tmpFilePath = os.path.join(baseConfig.outputFolder, tmpName)
open(tmpFilePath,"wb").write(response)
logging.info("Saved as temporary file: {0}. Calculating MD5.".format(tmpFilePath))
fileMD5 = md5SumFile(tmpFilePath)
filePath = os.path.join(baseConfig.outputFolder, fileMD5)
os.rename(tmpFilePath, filePath)
logging.info("Renamed as file: {0}. Checking Viper again.".format(filePath))
## My additions
## submit to cuckoo
bashCommand = "/opt/cuckoo/utils/submit.py --remote [IP Address of your cuckoo]:[API-Port of your cuckoo] --memory --unique " + filePath
logging.info("Sending to Cuckoo: " + bashCommand)
os.system(bashCommand)
## My additions
Start Viper by:
sudo -h -u spider /usr/bin/python /opt/viper/viper-api -H 10.10.101.12 -p 8080 >/var/log/viper-api.log &
sudo -h -u spider /usr/bin/python /opt/viper/viper-web -H 10.10.101.12 -p 9090 >/var/log/viper-web.log &
Extend cuckoo to support tags in MISP
To have a special tag within the (later) uploaded information in MISP, one needs to use some addiotions.
Thanks to David Gallagher, this is quite easy.
cd /opt
git clone https://github.com/daniel-gallagher/modules-cuckoo-mod.git
copy the files over to the corresponding directorys of your cuckoo installation and adjust the config files as my below samples.
reporting.conf
[misp]
enabled = yes
url = https://misp.[deleted].de
apikey = [deleted]
mode = maldoc ipaddr hashes url
title = IOCs from SOC automated cuckoo analysis:
tag = Cuckoo
distribution=0
threat_level_id=4
analysis = 0
ioc_blacklist = 8.8.8.8,8.8.4.4,www.google.com,crl.verisign.com,sc.symcb.com,teredo.ipv6.microsoft.com,157.56.106.189
min_malscore = 3
processing.conf
[misp]
enabled = yes
url = https://misp.[deleted].de
apikey = [deleted]
maxioc = 100
only_ids = yes
ioc_blacklist = 8.8.8.8,8.8.4.4,www.google.com,teredo.ipv6.microsoft.com,157.56.106.189
Let the fun beginn
No, that everything is set ready, let the fun begin.
Depending on how you've installed the cuckoo, start the "bird" by starting the web and API separetely or by calling /usr/sbin/cuckooboot
Back at the malcrawler, start the ph0neutria.
cd /opt/phoneutria
sudo -H -u spider /usr/bin/python ./run.py
Find your results
Your malcrawler:
Your Cuckoo:
Your MISP:

Job done, you have now fully automated your IOC crafting from live malware and are able to share/use this information within your sharing portal. - Well done ..!!!