
Cuckoo2GO: VMware Cuckoo with a nested VirtualBox analysis
Installation instructions for a "nested" Cuckoo installation.
Cuckoo Host is therefore a virtual machine in which virtual machines are operated.
The advantage is the clear portability of the entire solution because "only" a corresponding virtual machine has to be copied and the installation effort of this new Cuckoo instance is kept to a minimum.
Hardware requirements
1 TB storage (min) prevrably on fast SSD
32GB RAM (to run 5 targets on Win7)
Core i7 (Hypertreading with 8 cores
Install
Souce: https://medium.com/@soji256/build-a-malconfscan-with-cuckoo-environment-to-analyze-emotet-ff0c4c589afe
sudo apt install -y git make vim
sudo apt install -y python python-pip python-setuptools python-virtualenv virtualenv
sudo apt install -y libjpeg8-dev zlib1g-dev
cd
git clone https://github.com/JPCERTCC/MalConfScan.git
virtualenv venv
. venv/bin/activate
configuration
# for Volatility
git clone https://github.com/volatilityfoundation/volatility.git
cd volatility
python setup.py install
cd ../
pip install distorm3 pefile
cp MalConfScan/malconfscan.py venv/lib/python2.7/site-packages/volatility-2.6.1-py2.7.egg/volatility/plugins/malware/
cp -R MalConfScan/utils venv/lib/python2.7/site-packages/volatility-2.6.1-py2.7.egg/volatility/plugins/malware/
cp -R MalConfScan/yara venv/lib/python2.7/site-packages/volatility-2.6.1-py2.7.egg/volatility/plugins/malware/
# for MongoDB
sudo apt install -y libffi-dev libssl-dev libjpeg-dev zlib1g-dev swig
sudo apt install -y mongodb
# for elasticsearch 5.6.0 (https://github.com/cuckoosandbox/cuckoo/issues/2085)
sudo apt install -y openjdk-11-jdk
wget https://artifacts.elastic.co/downloads/elasticsearch/elasticsearch-5.6.0.deb
sudo dpkg -i elasticsearch-5.6.0.deb
rm elasticsearch-5.6.0.deb
# for mitmproxy
sudo apt install -y python3-dev python3-pip
pip3 install mitmproxy
# for tcpdump (https://cuckoo.readthedocs.io/en/latest/faq/#tcpdump-permission-denied)
sudo apt install -y apparmor-utils
sudo aa-disable /usr/sbin/tcpdump
sudo setcap cap_net_raw,cap_net_admin=eip /usr/sbin/tcpdump
# for non-root user (in this case, user name is "infected")
sudo usermod -a -G vboxusers infected
sudo groupadd pcap
sudo usermod -a -G pcap infected
sudo chgrp pcap /usr/sbin/tcpdump
sudo setcap cap_net_raw,cap_net_admin=eip /usr/sbin/tcpdump
# for VirtualBox
sudo apt install -y virtualbox
sudo vboxmanage hostonlyif create
sudo vboxmanage hostonlyif ipconfig vboxnet0 --ip 192.168.56.1 --netmask 255.255.255.0
vi .cuckoo/conf/auxiliary.conf[mitm]
# Enable man in the middle proxying (mitmdump) [yes/no].
#enabled = no
enabled = yes
(snip)
# path is correct.
#mitmdump = /usr/local/bin/mitmdump
mitmdump = /home/infected/.local/bin/mitmdump
vi .cuckoo/conf/cuckoo.conf# submission. Currently available for: VirtualBox and libvirt modules (KVM).
#memory_dump = no
memory_dump = yes
(snip)
# The value is expressed in bytes, by default 128 MB.
#upload_max_size = 134217728
upload_max_size = 1610612736
vi .cuckoo/conf/memory.conf[basic]
# Profile to avoid wasting time identifying it
#guest_profile = WinXPSP2x86
guest_profile = Win7SP1x86
vi .cuckoo/conf/processing.conf[memory]
# Create a memory dump of the entire Virtual Machine. This memory dump will
# then be analyzed using Volatility to locate interesting events that can be
# extracted from memory.
#enabled = no
enabled = yes
vi .cuckoo/conf/reporting.conf[mongodb]
#enabled = no
enabled = yes
(snip)
[elasticsearch]
#enabled = no
enabled = yes
(snip)
#hosts = 127.0.0.1
hosts = 127.0.0.1:9200
vi .cuckoo/conf/virtualbox.conf[cuckoo1]
# Specify the label name of the current machine as specified in your
# VirtualBox configuration.
#label = cuckoo1
label = Win7SP1x86
(snip)
# Example (Snapshot1 is the snapshot name):
#snapshot =
snapshot = cuckoo
(snip)
# Example (vboxnet0 is the interface name):
#interface =
interface = vboxnet0
sudo iptables -t nat -F
sudo iptables -F
sudo iptables -L
sudo iptables -A INPUT -i ens33 -j ACCEPT
sudo iptables -A INPUT -i lo -j ACCEPT
sudo iptables -A INPUT -i vboxnet0 -j ACCEPT
sudo iptables -A INPUT -m conntrack — ctstate ESTABLISHED,RELATED -j ACCEPT
sudo iptables -A FORWARD -m conntrack — ctstate ESTABLISHED,RELATED -j ACCEPT
sudo iptables -A POSTROUTING -t nat -j MASQUERADE
sudo iptables -A FORWARD -s 192.168.56.0/24 -d 192.168.0.0/16 -i vboxnet0 -o ens33 -j DROP
sudo iptables -A FORWARD -s 192.168.56.0/24 -d 172.16.0.0/12 -i vboxnet0 -o ens33 -j DROP
sudo iptables -A FORWARD -s 192.168.56.0/24 -d 10.0.0.0/8 -i vboxnet0 -o ens33 -j DROP
sudo iptables -A FORWARD -s 192.168.56.0/24 -i vboxnet0 -o ens33 -m conntrack — ctstate NEW -j ACCEPT
sudo iptables -P INPUT DROP
sudo iptables -P FORWARD DROP
sudo sysctl -w net.ipv4.ip_forward=1
sudo apt install -y iptables-persistentsudo
bash
echo net.ipv4.ip_forward=1 >> /etc/sysctl.conf
exit
sudo vboxmanage hostonlyif ipconfig vboxnet0 --ip 192.168.56.1 --netmask 255.255.255.0
cuckoo community
cuckoo
Start after reboot:
. venv/bin/activate.
cuckoo &
cuckoo web &
Win7 target config
Win7
https://developer.microsoft.com/en-us/microsoft-edge/tools/vms/
- Set display resolution to 1024 x 768
- Disable Windows Update
- Disable Windows Defender
- Disable Windows Firewall
- Disable UAC (Set not to notify)
- Select “Ask me later” when asked to set when starting IE
- Installing Python 2.7 https://www.python.org/ftp/python/2.7.13/python-2.7.13.msi
- Installing PIL-1.1.7.win32-py2.7.exe
http://effbot.org/downloads/PIL-1.1.7.win32-py2.7.exe - Set agent.py in startup folder
agent.py :
https://raw.githubusercontent.com/cuckoosandbox/cuckoo/master/cuckoo/data/agent/agent.py
Startup folder :
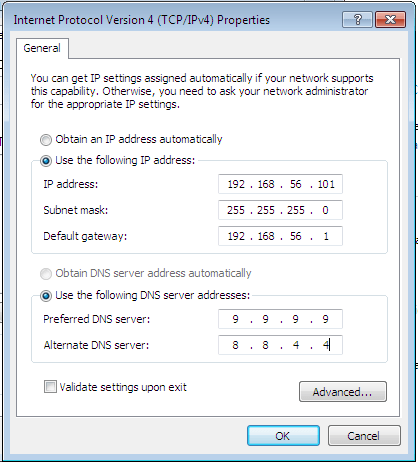
%AppData%\Microsoft\Windows\Start Menu\Programs\Startup - Network Settings
- IP address:192.168.56.101
- Subnet mask:255.255.255.0
- Default gateway:192.168.56.1
- Preferred DNS server:8.8.8.8
- Alternate DNS server:8.8.4.4 - Suppressing Network Noise (Disable Teredo, LLMNR, etc.)
- To open the Group Policy Editor, [Windows key] + R, and then type “gpedit.msc”
- Computer Configuration- > Administrative Templates- > Network- > DNS Client, and then enable “Turn off Multicast Name Resolution”
- Computer Configuration- > Administrative Templates- > System- > Internet Communication Management, and then enable “Restrict Internet Communication”
- Enter the following at the command prompt.
netsh interface teredo set state disabled
- Change the network configuration of VirtualBox to “Host-only Adapter”
- Make sure “vboxnet0” is selected
- If “Not Selected”, execute the following command
sudo vboxmanage hostonlyif ipconfig vboxnet0 --ip 192.168.56.1 --netmask 255.255.255.0
create init.reg
Windows Registry Editor Version 5.00[HKEY_LOCAL_MACHINE\HARDWARE\DESCRIPTION\SYSTEM]
“SystemBiosDate”=”06/12/10"
“SystemBiosVersion”=”BC1.05"
“VideoBiosVersion”=”VC1.20"[-HKEY_LOCAL_MACHINE\HARDWARE\ACPI\DSDT\VBOX__]
[-HKEY_LOCAL_MACHINE\HARDWARE\ACPI\FADT\VBOX__]
[-HKEY_LOCAL_MACHINE\HARDWARE\ACPI\RSDT\VBOX__]
[-HKEY_LOCAL_MACHINE\SOFTWARE\Oracle\Virtual Box Guest Additions]
[-HKEY_LOCAL_MACHINE\SYSTEM\ControlSet001\Services\VBox*]
[-HKEY_LOCAL_MACHINE\SYSTEM\ControlSet001\Control\CriticalDeviceDatabase\pci#ven_80ee&dev_cafe]
[-HKEY_LOCAL_MACHINE\SYSTEM\ControlSet001\Control\Class\{4D36E97D-E325–11CE-BFC1–08002BE10318}\0020]
[-HKEY_LOCAL_MACHINE\SYSTEM\ControlSet001\Enum\PCI\VEN_80EE&DEV_CAFE&SUBSYS_00000000&REV_00]
[-HKEY_LOCAL_MACHINE\SYSTEM\ControlSet001\services\VBoxGuest\Enum]
[-HKEY_LOCAL_MACHINE\SYSTEM\ControlSet002\Enum\PCI\VEN_80EE&DEV_CAFE&SUBSYS_00000000&REV_00]
[-HKEY_LOCAL_MACHINE\SYSTEM\ControlSet002\Control\Class\{4D36E97D-E325–11CE-BFC1–08002BE10318}\0020]
[-HKEY_LOCAL_MACHINE\SYSTEM\ControlSet002\Control\CriticalDeviceDatabase\pci#ven_80ee&dev_cafe]
[-HKEY_LOCAL_MACHINE\SYSTEM\ControlSet002\Enum\PCI\VEN_80EE&DEV_CAFE&SUBSYS_00000000&REV_00]
[-HKEY_LOCAL_MACHINE\SYSTEM\CurrentControlSet\Control\Class\{4D36E97D-E325–11CE-BFC1–08002BE10318}\0020]
[-HKEY_LOCAL_MACHINE\SYSTEM\CurrentControlSet\Control\CriticalDeviceDatabase\pci#ven_80ee&dev_cafe]
[-HKEY_LOCAL_MACHINE\SYSTEM\CurrentControlSet\Enum\PCI\VEN_80EE&DEV_CAFE&SUBSYS_00000000&REV_00]
[-HKEY_LOCAL_MACHINE\SYSTEM\CurrentControlSet\services\VBoxGuest\Enum]
- Uninstall “Oracle VM VirtualBox Guest Additions”
- Will be asked to reboot, so reboot - Verify agent.py is started after reboot
- You should see a black screen with the title “C:\Python 27\python.exe”
- If not started, check that the contents of agent.py match the contents of the source. - Minimize agent.py’s window so it doesn’t get in the way of screenshots during analysis
- Run the previously created init.reg
Cukoo Client Package und Moloch: https://infosecspeakeasy.org/t/howto-build-a-cuckoo-sandbox/27
Install from above Client package.
- python 2.7
- Pillow 5.3.1
- agent.py (link to autostart)
- Adobe Reader 11.0.1 (no update check) (Start one to accept EULA)
- Adobe FlashPlayer 11.0.9(no update check)
- NDP451
- Chrome Browser (no Feedback to Google.com) (Start one to accept EULA, disable all services that give Google feedback of your activity)) Set as default Browser)
Change the Network type in VirtualBox from "Bridged" to "Host Only"
Disable IPv6 and set IPv4 within the Win7 VM as:
While the Machine is still running in the desired mode, create a VirtualBox Snapshot
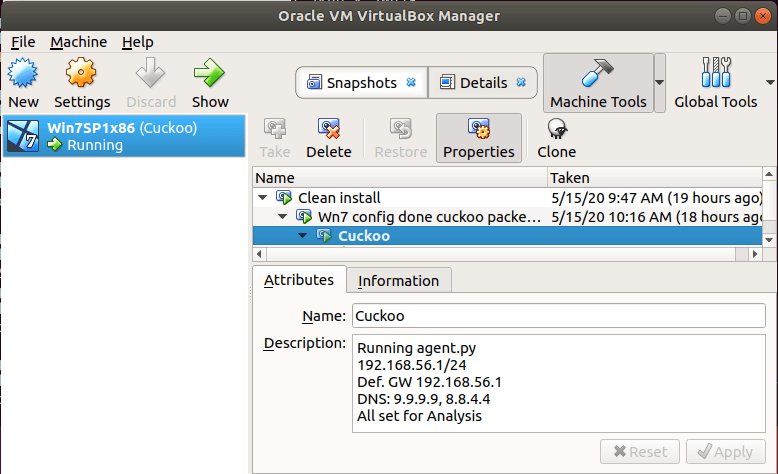
About to start the first time
Verify that you took the VirtualBox snapshot of your Setup. Otherwise it will be gone after the first start. ![]()
Check that you are using the very last Version of Cuckoo (this also does an update for later use
. venv/bin/activate
sudo pip install virtualenv --upgrade
pip install -U cuckoo
cuckoo community
/home/analyst/venv/bin/cuckoo -d rooter -g analyst --sudo
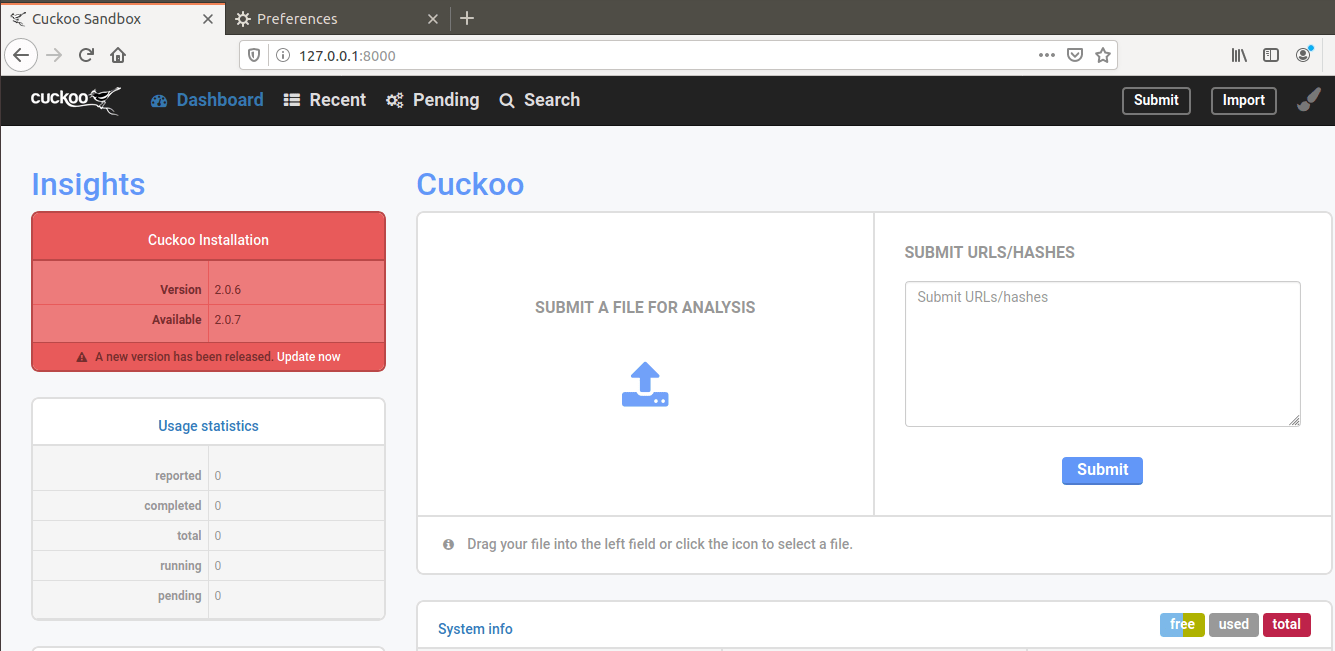
cuckoo -d
cuckoo web -H 0.0.0.0 -p 8000
Autostart Cuckoo
https://www.mpauli.de/autostarting-cuckoo-2-0-x.html
sudo apt install supervisord
vi /etc/supervisor/conf.d/cuckoo.conf
[supervisord]
logfile = /var/log/supervisor/supervisord.log
pidfile = /home/analyst/.cuckoo/supervisord/pidfile
user = root
[supervisorctl]
serverurl = unix:///home/analyst/.cuckoo/supervisord/unix.sock
[rpcinterface:supervisor]
supervisor.rpcinterface_factory = supervisor.rpcinterface:make_main_rpcinterface
[unix_http_server]
file = /home/analyst/.cuckoo/supervisord/unix.sock
[program:cuckoo-rooter]
command = /home/analyst/venv/bin/cuckoo rooter -g analyst
user = root
startsecs = 10
autorestart = true
[program:cuckoo-daemon]
command = /home/analyst/venv/bin/cuckoo -d -m 10000
user = analyst
startsecs = 30
autorestart = true
[program:cuckoo-process]
command = /home/analyst/venv/bin/cuckoo process p%(process_num)d
process_name = cuckoo-process_%(process_num)d
numprocs = 4
user = analyst
autorestart = true
[program:cuckoo-web]
command = /home/analyst/venv/bin/cuckoo web -H 0.0.0.0 -p 8000
user = analyst
startsecs = 30
autorestart = true
[program:cuckoo-api]
command = /home/analyst/venv/bin/cuckoo api -H 0.0.0.0 -p 8080
user = analyst
startsecs = 30
autorestart = true
[group:cuckoo]
programs = cuckoo-rooter, cuckoo-daemon, cuckoo-process, cuckoo-web, cuckoo-api
[program:distributed]
command = /home/analyst/venv/bin/python -m cuckoo.distributed.worker
user = analyst
autostart = false
autorestart = true
environment = CUCKOO_APP="worker",CUCKOO_CWD="/home/analyst/.cuckoo"
sudo service supervisor restart
ps aux should show:
