The (M)alware (I)nformation (S)hare (P)ortal aka MISP

Features of MISP, the open source threat sharing platform.
A platform for sharing, storing and correlating Indicators of Compromises of targeted attacks. Discover how MISP is used today in multiple organisations. Not only to store, share, collaborate on malware, but also to use the IOCs to detect and prevent attacks.
About MISP
Isn't it sad to have a lot of data and not use it because it's too much work? Thanks to MISP you can store your IOCs in a structured manner, and thus enjoy the correlation, automated exports for IDS, or SIEM, in STIX or OpenIOC and even to other MISPs. You can now leverage the value of your data without effort and in an automated manner.
The primary goal of MISP is to be used. This is why simplicity is the driving force behind the project. Storing and especially using information about threats and malware should not be difficult. MISP is there to help you get the maximum out of your data without unmanageable complexity.
Sharing is key to fast and effective detection of attacks. Quite often similar organisations are targeted by the same Threat Actor, in the same or different Campaign. MISP will make it easier for you to share with, but also to receive from trusted partners and trust-groups. Sharing also enabled collaborative analysis and prevents you from doing the work someone else already did before.
Join one of the existing MISP communities.
Get part of the team, install your own MISP
The profesional way to the MISP-crowd is to install a clean and fresh version from scratch within a new Linux.
See: https://github.com/MISP/MISP
Everything you need is there and also a complete bunch of HowTo's.
The faster way to get you going, but not for a professional way of MISP, is to download the predefined virtual image that has everything already done for you to get you going right away.
The access to this version can be found on the MISP-Training website but with the time of writing it was:
MISP admin:  admin@misp.training/Password1234
MISP user:  user@misp.training/Password1234
SSH: misp/Password1234
MySQL:  root/Password1234 - misp/Password1234
So, what you are waiting for? Get yourself involved into the "sharing world".
Accessing the MISP-Data from within Splunk to correlate your livedata with the MISP events
Wouldn't it be great to have the chance of seeing which of your network activity is related to a known malicious event?
Well if you send your firewall and proxy logs to Splunk, there is a way of achieving this.
First, make shure all your related data is being sent to your Splunk instance by using syslog or a native splunk forwarder.
Second, make sure you respect what Splunk calls CIM. All source and destination IP fields should have the same name, what ever source they are being taken from.
SourceIP -> src_ip
DestinationIP -> dst_ip
Prepare MISP
Having not found a reliable logfile within the MISP instance to run Splunk on, I decided to use the MySQL-Backend of MISP to catch the data.
But a view things need to be done prior of being able to access the SQL-DB from Splunk.
The MISP-DB need to run on a non-127.0.0.1 Ininterface
Change as per below in /etc/mysql/my.cnf:
##bind-address = 127.0.0.1
bind-address = 0.0.0.0
Find to actual password to access the DB:
root@misp:/var/www/MISP/app/Config# cat database.php
And execute: mysql -p misp -p Password1234
Now create a new user and grant him all the access:
mysql>GRANT ALL ON *.* to splunk@'[IP of your splunk instance]' IDENTIFIED BY 'put-your-password-here';
mysql>FLUSH PRIVILEGES;
mysql>exit
Restart mysql (service mysql restart) and this part of the job is done.Prepare Splunk
Simply install the Splunk-App "DB connect V2" and configure it as below:
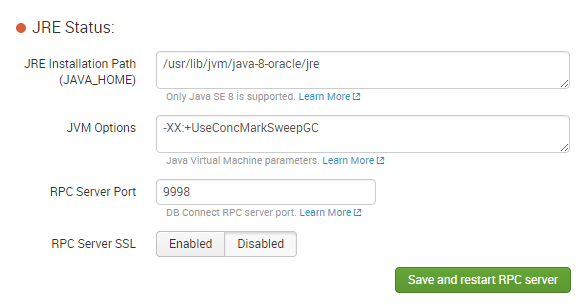
I had to install the Oracle JRE to get the App run, so the below lines might help if you have the same issue:
Get the jre-8uVERSION-linux-x64.tar.gz from Oracle
sudo add-apt-repository ppa:webupd8team/java 438
apt-get update
sudo apt-get install oracle-java8-installer
sudo apt-get install oracle-java8-set-default
Download and install the MySQL-connector:
wget http://dev.mysql.com/downloads/file/?id=462849
tar -xvzf mysql-connector-java-5.1.39.tar.gz
find ./ -name "*.jar"
cp ./mysql-connector-java-5.1.39/mysql-connector-java-5.1.39-bin.jar /opt/splunk/etc/apps/splunk_app_db_connect/bin/lib/
chown -R splunk:splunk /opt/splunk/etc
Finally configure the Splunk App:
Settings:
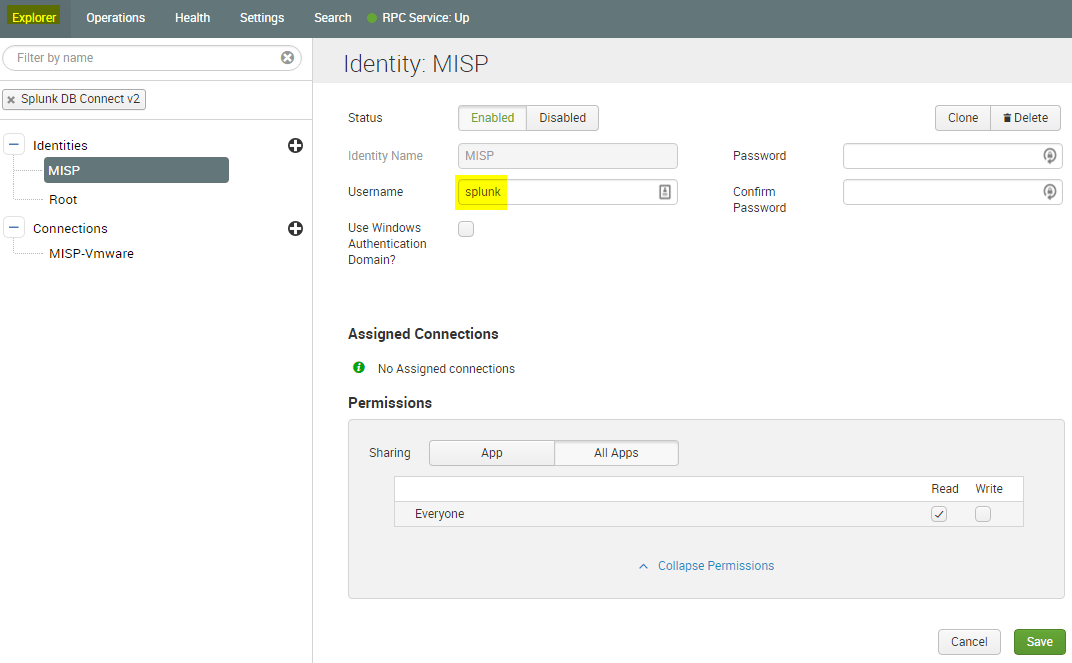
Create the user to access the DB with the same credentials you just granted within mysql:
And craete the actual connection to the MISP instance:
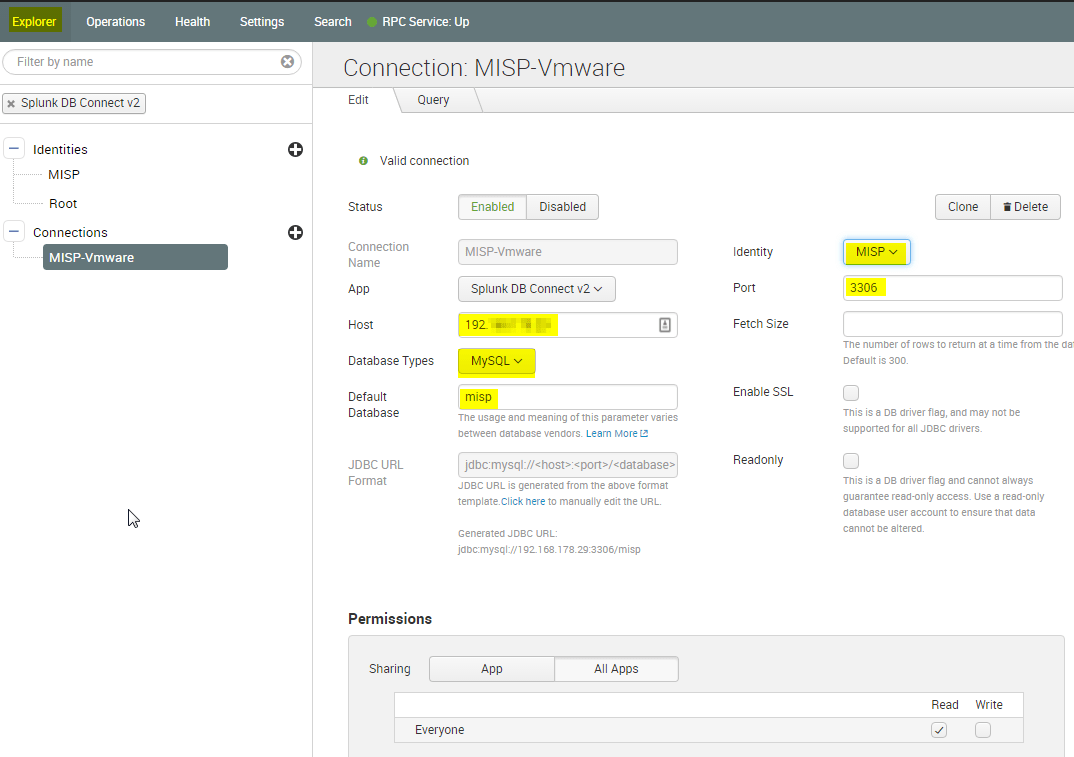
Done, you should now be able to make your first successful SQL-Query from Splunk:
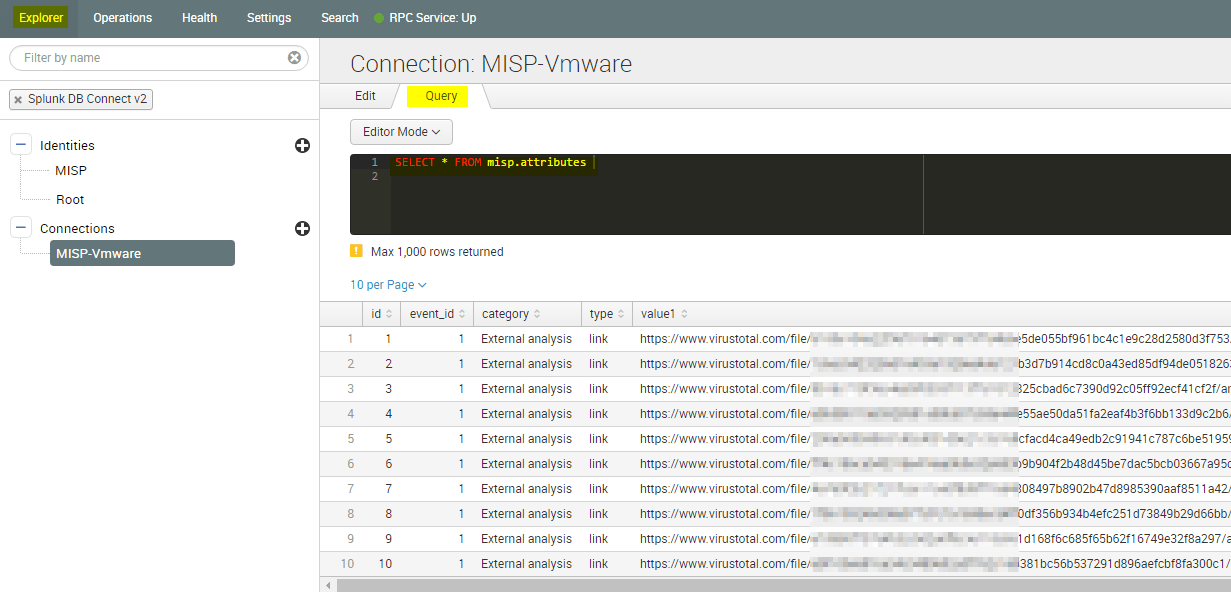
To search within the Splunk CLI, use below sample:
| dbxquery query="SELECT * FROM misp.attributes " connection="MISP-Vmware" wrap=t
Congratulations, you just connected Splunk to MISP....!!!! :-)
Accessing the data
As the MISP-DB has a lot of fields, I needed to create a simple view that joins the major fields of information together to have an easy way for a Splunk search to access it.
The search I crafted to perform the below db-lookup in the inputs.conf was:
| dbxquery query="SELECT event_id, category, value1 attribute, value2 md5, date, events.id event_id, events.info FROM misp.attributes JOIN misp.events ON attributes.event_id = events.id WHERE attributes.category = \"Network activity\" " connection="MISP-Vmware" maxrows=100 shortnames=t
inputs.conf entry to create the db-lookup (hosted on 192.168.178.29) should look like:
[mi_lookup://misp_network]
connection = MISP-Vmware description = MISP network related MySQL lookup input_fields = attribute interval = 3600 lookupSQL = SELECT event_id,\ category,\ value1 attribute,\ value2 md5,\ events.id,\ events.date,\ events.info\ FROM misp.attributes\ JOIN misp.events\ ON attributes.event_id = events.id\ WHERE attributes.category = "Network activity" output_fields = event_id,category,md5,date,info ui_auto_lookup_conditions = [{"type":"host","value":"192.168.178.29","removable":false,"stanza":"host::192.168.178.29"}] ui_column_output_map = [{"removable":true,"label":"event_id","value":"event_id","name":"event_id","alias":"misp_event_id"},{"removable":true,"label":"category","value":"category","name":"category","alias":"misp_category"},{"removable":true,"label":"md5","value":"md5","name":"md5","alias":"misp_md5"},{"removable":true,"label":"date","value":"date","name":"date","alias":"misp_published_date"},{"removable":true,"label":"info","value":"info","name":"info","alias":"misp_comment"}] ui_field_column_map = [{"name":"dstip","selected":true,"removable":true,"label":"dstip","value":"dstip","alias":"attribute"}] ui_input_spl_search = sourcetype=syslog | fields dstip url ua ui_is_auto_lookup = 1 ui_query_result_columns = [{"name":"event_id"},{"name":"category"},{"name":"attribute"},{"name":"md5"},{"name":"id"},{"name":"date"},{"name":"info"}] ui_use_saved_search = 0
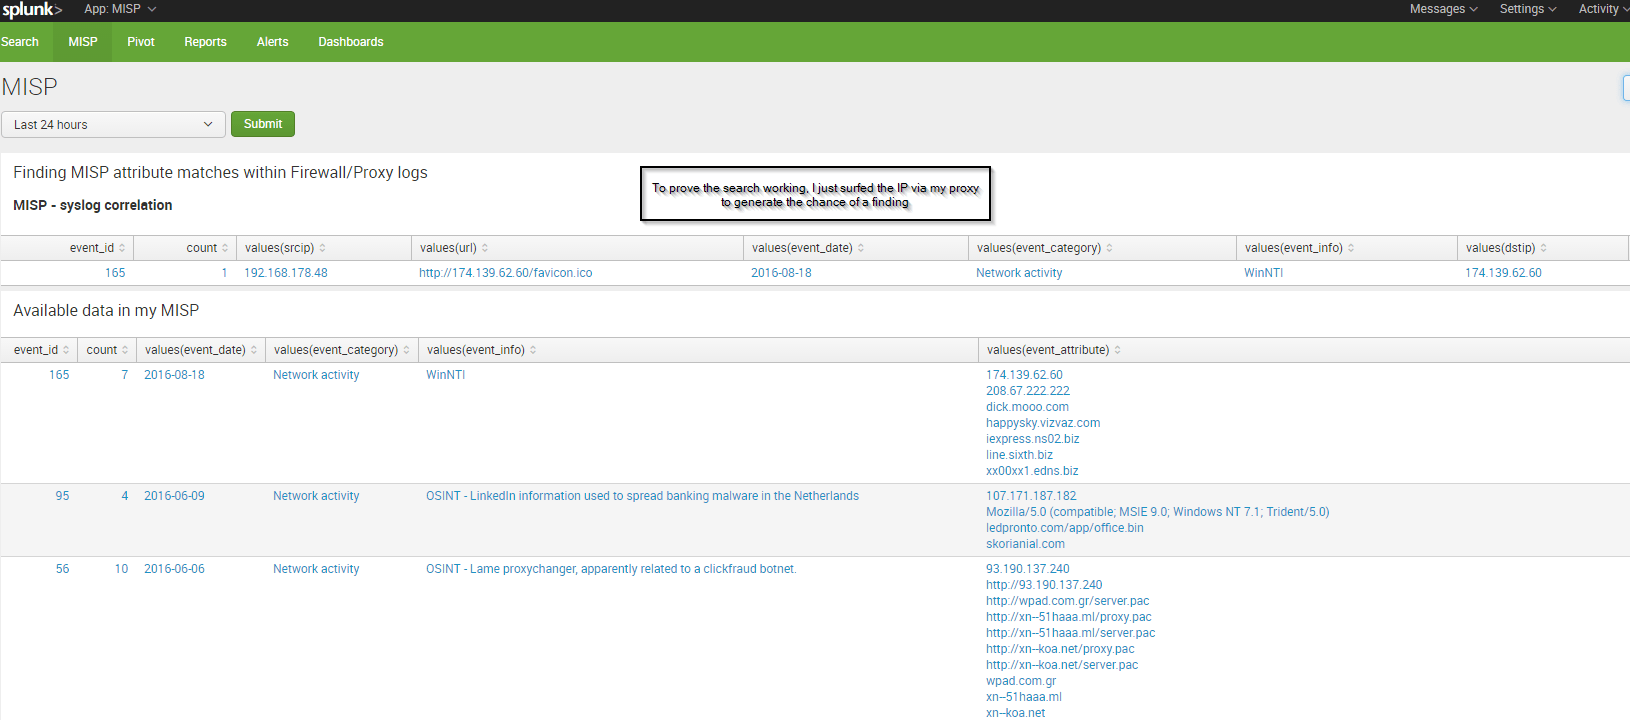
To do the final search with an inner join, you'll see if one of your actions recorded by a firewall has had some known bad destination, use:
| dbxquery query="SELECT event_id,category,value1 attribute, value2 md5,events.id,events.date,events.info FROM misp.attributes JOIN misp.events ON attributes.event_id = events.id WHERE attributes.category = \"Network activity\"" connection="MISP-Vmware" wrap=t | rename "(001) attributes.event_id.INT" AS event_id | rename "(002) attributes.category.VARCHAR" AS event_category | rename "(003) attributes.attribute.VARCHAR" AS dstip | rename "(004) attributes.md5.VARCHAR" AS event_md5 | rename "(006) events.date.DATE" AS event_date | rename "(007) events.info.VARCHAR" AS event_info | rename "(006) events.date.DATE" AS event_date | join type=inner dstip [search sourcetype=syslog | table dstip srcip url] | fillnull | stats count values(srcip) values(url) values(event_date) values(event_category) values(event_info) values(dstip) values(event_md5) by event_id | sort - values(event_date)
To see all your data in the MISP database use:
| dbxquery query="SELECT event_id, category, value1 attribute, value2 md5, events.id, events.date, events.info FROM misp.attributes JOIN misp.events ON attributes.event_id = events.id WHERE attributes.category = \"Network activity\"" connection="MISP-Vmware" wrap=t | rename "(001) attributes.event_id.INT" AS event_id | rename "(002) attributes.category.VARCHAR" AS event_category | rename "(003) attributes.attribute.VARCHAR" AS event_attribute | rename "(004) attributes.md5.VARCHAR" AS event_md5 | rename "(006) events.date.DATE" AS event_date | rename "(007) events.info.VARCHAR" AS event_info | rename "(006) events.date.DATE" AS event_date | stats count values(event_date) values(event_category) values(event_info) values(event_attribute) values(event_md5) by event_id | sort - values(event_date)
You can download my version of the dashboard here and import it as XML-source file.